You will need:
– Two bicycle wheels
– A garden cart body or a large plastic bin
– Wheelbarrow handles
– Hinges
– Bolts and nuts
– A drill
1. Remove the tires from the bicycle wheels. You can do this by using a tire lever or a screwdriver.
Be careful not to damage the wheel rims.
2. Attach the wheels to the garden cart body or large plastic bin using hinges. Make sure that the bolts are tightened securely.
3. Attach wheelbarrow handles to the top of the cart for easy steering.
- If you want to make a garden cart with bicycle wheels, you will need to gather a few supplies
- You will need two bicycles wheels, a piece of plywood, some wood screws, and a drill
- Once you have all of your supplies, follow these steps: 1
- Drill four holes in the plywood, spaced evenly apart
- These holes should be big enough to fit the wood screws through
- Screw the bicycle wheels onto the plywood using the wood screws
- Make sure that the axle of the wheel is pointing downwards so that it can rotate freely
- Your garden cart is now complete! You can use it to haul gardening supplies or anything else that you need to transport around your yard or garden
Making a garden cart– Part 1 Wheels
Diy Axle for Bicycle Wheels
Bicycles are a great mode of transportation and exercise, but they can be expensive. A do-it-yourself axle for bicycle wheels is a great way to save money.
You will need:
-1/2″ diameter steel rod (length will vary depending on your bike)
-2 washers that fit over the steel rod
-2 nuts that fit over the steel rod
-4 bearings (two for each wheel)
-8 bearing cones (four for each wheel)
-16 locknuts (eight for each wheel) – these keep the bearings from coming loose
Tools:
– drill
– tap and die set OR a threading kit OR a power drill with various size bits to create threads in the steel rod
Instructions:
1. Cut the steel rod to the desired length using a hacksaw. The length will depend on the size of your bicycle frame.
You’ll want it to be long enough so that there is about an inch of space between the end of the axle and the inside of the dropouts on your frame.
2. Using a drill, create two holes near each end of the axle, big enough for your washers and nuts to fit through snugly. These holes will be used to secure the wheels onto the axle later on.
3. If you have a tap and die set, use it now to thread both ends of the hole so that your nuts will screw on easily later. If you don’t have this tool, don’t worry – you can still make do without it by following instructions 4 or 5 instead.
4a. If you’re using a threading kit: select two dies that are slightly smaller than outer diameter of your chosen nut size; follow instructions provided with kit to thread both ends of hole; ream out any burrs inside hole with smooth file so that nut screws on easily later . 4b. If you’re not using a threading kit: measure inner diameter (ID)of one of your chosen nuts; add 1/64″to ID measurement; Drill bit should be this new measurement; Use power drill fitted with appropriate bit to twist clockwise into both ends until threads are created all way around circumference inside hole (be careful not to go too deep – stop when just shyof breaking through bottom side); remove debris from inside holes so that nuts screw on easily later .5a .
How to Make a Wagon Steering Axle
A wagon steering axle is a necessary component of any wagon, whether it be for agricultural or transportation purposes. The axle keeps the wheels in line so the wagon can be pulled in a straight line. It also provides support for the weight of the load being carried by the wagon.
Without a steering axle, a wagon would be difficult to control and could easily veer off course.
There are two main types of steering axles: live and dead. A live axle is connected to the wheels via bearings, allowing it to rotate along with them.
This type of axle is typically used on smaller wagons such as those used for gardens or children’s toys. A dead axle, on the other hand, is not connected to the wheels and simply provides support without rotation. Dead axles are more common on larger wagons such as those used for hauling heavy loads.
No matter what type of steering axle you choose, there are some basic steps involved in putting it together. First, you’ll need to determine where your axle will be located in relation to the rest of your wagon (typically near the center). Once you have that figured out, you can start assembling your parts.
If you’re using a live axle, you’ll need to attach bearings to both sides of it before connecting it to your wheels. For a dead axle, simply connect it directly to your frame using bolts or welds.
Once your steering axle is in place, all that’s left is to connect your wheels and start pulling!
With these simple instructions, anyone can easily add this essential component to their ownwagon project.
How to Make Trolley Cart
A trolley cart is a great way to move heavy objects around your home or office. Here are some tips on how to make your own trolley cart:
1. Gather your materials.
You will need four caster wheels, two pieces of plywood, screws, washers, and nuts.
2. Cut the plywood into two pieces that are the same size. These will be the top and bottom of your trolley cart.
3. Attach the caster wheels to the bottom piece of plywood using screws and washers. Make sure that the wheels are evenly spaced apart.
4. Place the top piece of plywood on top of the caster wheels and attach it using screws and nuts.
Again, make sure that the screws are tightened securely so that the top does not come loose while in use.
5 That’s it! Your trolley cart is now ready for use!
Bicycle Wheel Cart Axle
A bicycle wheel cart axle is a device that attaches a wheel to a cart. It typically consists of a shaft with two bearings that support the wheel on either side. The axle may also have a brake disc or other mechanism attached to it.
How to Add Wheels to a Cart
If you’re like most people, you probably don’t think much about the wheels on your shopping cart. But did you know that there are a few different ways to add wheels to a cart? Here’s a quick guide on how to do it:
1. Find the right size and style of wheels for your cart. There are a variety of sizes and styles available, so make sure to find the ones that will fit your particular cart.
2. Attach the wheels to the axles of the cart.
This is usually done by screwing or bolting them in place.
3. Make sure the wheels are secure and can’t come off easily. You don’t want them falling off while you’re using the cart!
That’s all there is to it! With just a few simple steps, you can add wheels to your shopping cart and make it easier to get around town.
How to Build a Cart With Wheels
If you’re looking to build a cart with wheels, there are a few things you’ll need to take into consideration. First, you’ll need to decide what kind of wood you want to use. A variety of woods can be used for this project, but some are better suited than others.
For example, pine is a softer wood that’s easy to work with, but it’s not as durable as hardwoods like oak or maple. You’ll also need to consider the weight of your materials when choosing a wood type – lighter woods will be easier to maneuver, but they may not be able to hold as much weight.
Once you’ve chosen your wood, it’s time to start building!
Cut four pieces of lumber that are equal in length – these will form the sides of your cart. Drill pilot holes in each piece and then screw them together using two screws at each joint. Next, cut two pieces of lumber for the front and back panels of your cart.
These should be slightly shorter than the side panels so that they fit flush against them. Attach these panels in the same way that you attached the side panels.
Now it’s time for the wheels!
You can purchase pre-made wheels at most hardware stores, or you can make your own using plywood or another sturdy material. If you’re making your own wheels, cut out circles that are slightly larger than the width of your axles (the dowels or rods that will go through the center of each wheel). Make sure to sand down any rough edges on your wheels before attaching them – otherwise they could damage your flooring when rolling around on them!
To attach the wheels, drill pilot holes through both the axle and wheel and then secure them together using bolts or screws.
Finally, add a handle to one end of your cart so that you can easily push it around. You can use anything for this – even an old broom handle!
Just drill a hole through one side panel and insert the handle so that it’s securely in place. And there you have it – a homemade cart with wheels!
How to Attach Bike Wheels to Wood
Bike wheels can be attached to wood in a few different ways. The most common method is to use screws and washers. First, mark the center of the axle hole on the wood.
Then, pre-drill a pilot hole that is slightly smaller than the screw you will be using. Next, insert the screw through the washer and into the pilot hole. Tighten the screw until it is snug against the wheel.
Repeat this process for the other side of the wheel.
Another way to attach bike wheels to wood is by using bolts and nuts. This method is similar to using screws, but you will need to use a drill bit that is slightly larger than the bolt you are using.
Drill a hole through both sides of the wood at the axle hole location. Insert a bolt through one side of the wood and thread on a nut. Tighten the nut until it is snug against the wheel.
Repeat this process for both sides of both wheels.
Bicycle Garden Cart
If you are someone who loves to garden, then you know how difficult it can be to lug all of your supplies around with you. A bicycle garden cart can help make your life a lot easier. This type of cart is designed to attach to the back of your bicycle, so that you can easily transport all of your gardening supplies with you.
There are a few different types of bicycle garden carts on the market, so it is important to do some research before purchasing one. You will want to consider things like the size and weight capacity of the cart, as well as any features that might be useful for you. Once you have found the perfect cart for your needs, enjoy being able to easily transport all of your gardening supplies around with you!

Credit: www.pinterest.com
How Long Does It Take to Make a Wooden Cart?
Building a wooden cart is a project that can be completed in a weekend with some basic carpentry skills. The following steps will outline the process of building a basic wooden cart.
1. Choose the wood for your cart.
For durability, select hardwoods such as oak, maple or cherry. If you plan to use the cart outdoors, pressure-treated lumber is a good option.
2. Cut the wood to size using a saw.
The dimensions of your cart will depend on its intended purpose. A small garden cart might be 24 inches wide by 36 inches long, while a larger utility cart could be 48 inches wide by 72 inches long.
3. Assemble the frame of the cart using pocket screws and glue.
Drill pilot holes for the screws to prevent splitting the wood. If you’re using pressure-treated lumber, predrill all holes to avoid rusting out your drill bit prematurely.
4 .
Attach the wheels to the frame using bolts or lag screws and washers (if necessary). Make sure that the wheels are securely attached before moving on to step 5 . You may want to consider adding brakes if your cart will be used on inclines or carrying heavy loads.
.
5 . Add any shelves, drawers or other features that you desire.
Keep in mind that anything you add will add weight and affect how easily yourcart moves.. 6 Finish up by sanding down any rough edges and givingthe entire piecea final coat of paint or stain..
Depending on its intended purpose, additional features can be addedto makeyourcart more functional.. For example, ifyou’llbe usings itto transport gardening supplies , includea removable trayor bin for soiland tools .. Ifyou have extra timeand materials , think about customizingyourcartwith unique details like carved designs or metal accents . By taking careof these final touches ,you’llhave acartthat’s not onlyfully functional but also eye-catching and one-of-a-kind..
How Do You Attach an Axle to a Cart?
If you’re looking to attach an axle to a cart, there are a few things you’ll need to do. First, you’ll need to gather your materials. You’ll need the axle, two washers, and four nuts.
You’ll also need a drill and a bit that is slightly smaller than the diameter of the axle. Once you have your materials gathered, you can begin attaching the axle to the cart.
First, take the drill and make two holes in each side of the cart at equal distances from the front and back of the cart.
These holes should be big enough for the axle to fit through them snugly. Next, take one of your washers and put it on one end of the axle. Thread two of your nuts onto the other end of the axle until they’re tight against the washer.
Now it’s time to put the axle through both holes in your cart so that it sticks out equally on both sides. Take another washer and put it on one end ofthe protruding part ofthe axle outsideofyour cart .Threadon anothertwo nutsandtightenthemagainst thiswasher .
Youmayneedto usethe wrenchfor thisparticularstep .Andthat’sit !
How Do You Replace a Cart Wheel?
If you’re in need of a new wheel for your shopping cart, never fear! Replacing a cart wheel is a relatively easy process that anyone can do with just a few tools. Here’s what you’ll need to do the job:
-A new wheel. You can find replacement wheels at most hardware stores.
-A wrench.
This will be used to loosen and tighten the bolts on your cart.
-A screwdriver. You’ll need this to remove the hubcap on your old wheel (if your cart has one).
-Pliers. These may come in handy if the nuts on your bolts are particularly tight.
Now that you have all the necessary tools, here’s how to replace your cart’s wheel:
1) First, use your wrench to loosen the bolts that hold your old wheel in place. If these are particularly tight, you may need to use pliers as well. Once the bolts are loosened, remove them entirely and set them aside.
2) Next, remove the old wheel by pulling it straight off of the axle. If there is a hubcap covering the center of the wheel, use your screwdriver to remove it before continuing.
3) Take your new wheel and line it up with the empty space left by the old one.
Make sure that it is positioned correctly before proceeding; otherwise, it will be difficult to get it seated properly later on.
4) Once positioned correctly, push or pullthe new wheel onto the axle until it is snug againstthe other side ofthecartframe(or untilit stops moving altogether). 5)Replaceandtightentheboltssecuringthenewwheelinplace usingyourwrench.(Again,pliersmaybenecessaryifthesenutsaretight.) Andthat’sit!
How Do You Remove a Garden Wagon Wheel?
Assuming you mean a wheelbarrow:
To remove a garden wagon wheel, first place the wheelbarrow on its side. Next, use a wrench to loosen the bolts that hold the wheel in place.
Once the bolts are loosened, you should be able to simply pull the wheel off of the axle. If the wheel is stuck, you may need to tap it with a mallet or hammer to get it to budge.
Conclusion
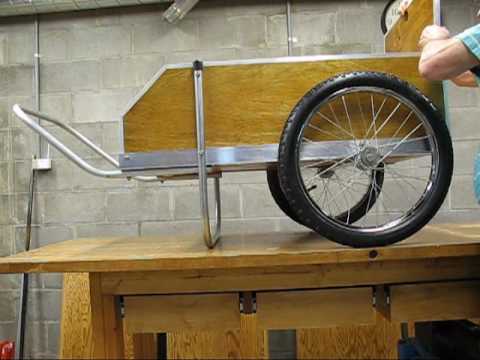
How to Make a Garden Cart With Bicycle Wheels
We all know how frustrating it is to lug around our gardening supplies, tools, and plants from one place to another. If you have a lot of land to cover, or if you simply don’t want to damage your back carrying everything, then you need a garden cart.
You can purchase one online or at your local hardware store, but they can be expensive. A great alternative is to make your own garden cart with bicycle wheels! Not only is this option more economical, but it’s also eco-friendly because you’re upcycling old materials.
Here’s how:
You will need:
-2 bicycles wheels (with tires)
-1 piece of plywood (at least 4’x4′)
-4 PVC pipes (each 10″ long) -8 bolts (each 1″ long) and washers
-4 L brackets -Drill -Paint or sealant (optional)
First, take your piece of plywood and cut it down to size so that it will fit comfortably between the two bicycle wheels. Next, drill four holes evenly spaced out along the edges of the plywood. These holes should be big enough for the PVC pipes to fit through snugly.
Thread the PVC pipes through the holes on the plywood and then secure them in place with bolts and washers. Be sure to add a L bracket at each corner where the PVC pipes intersect in order to further reinforce the structure. Once everything is assembled, give your garden cart a coat of paint or sealant if desired.
And that’s it! Now you can load up your new garden cart with all of your supplies and wheel it around with ease.