A garden cart is a great way to move heavy loads of dirt, mulch, and rocks around your yard or garden. Here are the supplies you will need to build a garden cart: four wheels (preferably with pneumatic tires), two pieces of plywood cut to size, screws, nails, screwdriver, hammer, drill, saw. To put it together:
1) Attach the wheels to the underside of the plywood using screws and nails. 2) Drill holes in the plywood and attach them together using screws. 3) Add handles for easy maneuverability.
4) Fill your new garden cart with all your gardening supplies and get to work!
- To build a garden cart, first gather the materials you will need: four wooden boards, two caster wheels, screws, nails, and a drill
- Cut the boards to the desired size using a saw
- The boards should be cut to create a rectangular shape with two shorter sides and two longer sides
- Affix the caster wheels to the underside of the shorter sides of the board using screws or nails
- Make sure that the wheels are securely attached so that the cart can roll smoothly
- Drill holes into each corner of the long sides of the board
- These holes will be used to attach handles later on
- Nail or screw each long side of the board onto opposite ends of one of the short sides, creating a box-like shape
- Be sure that all corners are flush and that there is no gap between any of the boards
- This will be where you store your gardening supplies in your new cart!
How to Build a GARDEN CART
How to Build a Utility Cart With Wheels?
Are you in need of a utility cart that can be easily moved around your home or office? If so, then building a utility cart with wheels may be the perfect solution for you. This type of project is relatively easy to do and only requires a few materials.
Plus, it’s a great way to add some extra storage space to your home or office. Here’s how to build a utility cart with wheels:
1. Start by measuring the area where you plan on placing the utility cart.
This will help you determine the size of the cart and how many shelves it will need.
2. Next, gather all of the materials you’ll need for the project. This includes wood boards, screws, caster wheels, and brackets (if desired).
3. Cut the wood boards to size using a saw. Make sure all cuts are straight and precise.
4. Assemble the shelves by screwing them into place or attaching them with brackets (if using).
Then, attach the caster wheels to the bottom of each shelf using screws or nails (depending on their size).
5. Finally, place your utility cart in its desired location and fill it with whatever items you need to store!
How Do You Make a Wooden Cart?
Building a wooden cart is a relatively simple project that can be completed in a weekend with basic woodworking skills and tools. The first step is to cut the lumber to size. For the sides of the cart, you will need two pieces of lumber that are 24 inches long and 12 inches wide.
For the base of the cart, you will need one piece of lumber that is 24 inches long and 18 inches wide.
The next step is to assemble the sides of the cart. To do this, take one of the 24 inch long boards and place it on top of the other board so that they are perpendicular to each other.
Then, use screws or nails to attach them together at all four corners. Repeat this process for the base piece of lumber.
Once the sides and base are assembled, you can attach them together by screwing or nailing them together at all four corners.
Then, flip your cart over so that it is standing upright on its base. Attach caster wheels to all four corners of your cart using screws or nails so that it can be easily moved around. Finally, add a handle to your cart so that it can be pulled along behind you as you walk.
What is a Gardeners Cart Called?
A gardeners cart is a small, wheeled cart that is used to transport gardening supplies and tools. It is typically made of plastic or metal and has multiple shelves or compartments for storing different items. Gardeners carts can be very helpful for those who have large gardens or who need to move around a lot of supplies.
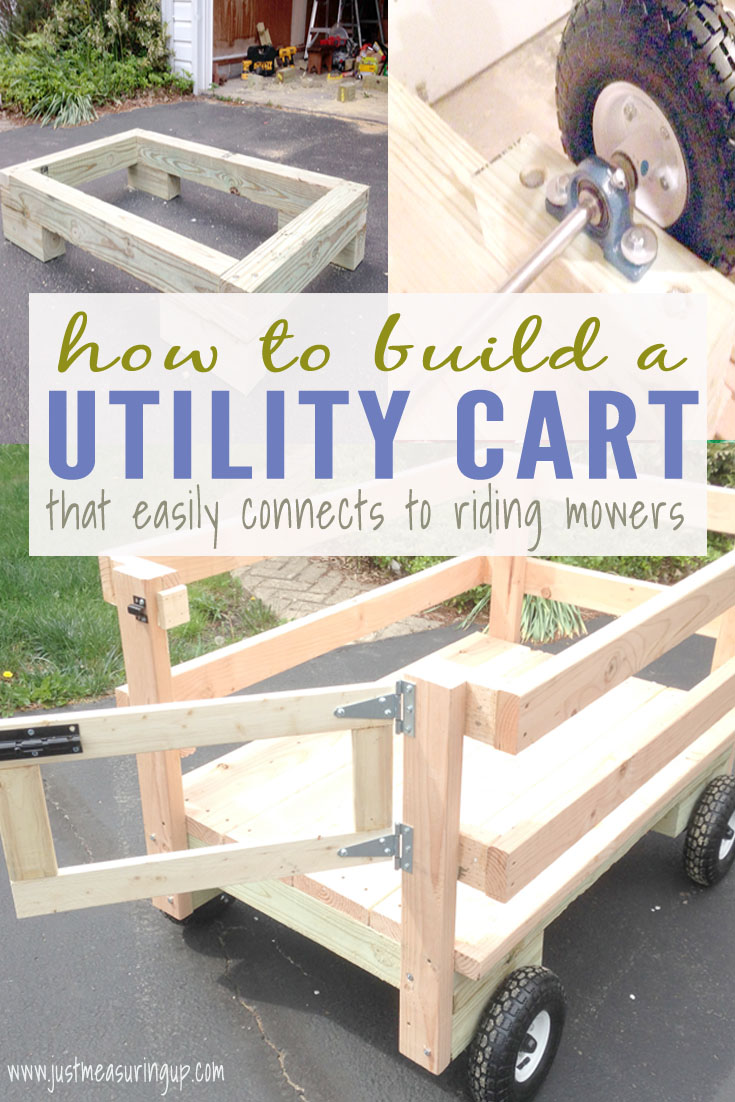
Credit: www.justmeasuringup.com
How to Make a Garden Cart Axle
A garden cart is a great way to move heavy loads of dirt, mulch, and debris around your yard. But one of the most important parts of a garden cart is the axle. Without a properly functioning axle, your garden cart will be very difficult to use.
Here are some tips on how to make a garden cart axle that will last for years:
1. Start with a strong piece of wood. Garden carts are often quite heavy, so you’ll need a sturdy piece of wood for the axle.
Look for something that’s at least 2 inches thick and 1 foot wide.
2. Cut the wood to size. The length of your axle will depend on the size of your garden cart, but it should be at least 3 feet long.
Once you’ve determined the length, use a saw to cut the piece of wood to size.
3. Drill holes for the wheels. Once you have your axle cut to size, drill holes in each end for the wheels .
The diameter of these holes should be slightly larger than the width of your wheels so they can spin freely .
4 . Attach the wheels .
To attach the wheels , first insert them into the drilled holes . Then , using screws or nails , secure them in place . Be sure that they’re secured tightly so they don’t come loose while you’re using the garden cart .
5 Test it out ! Now that your wheels are attached , it’s time to test out your new gardencartaxle ! Put it in place on your garden cart and give it a spin . If everything looks good , then you’re ready to start hauling those heavy loads around !
Garden Cart Kit
Garden Cart Kit
A garden cart kit can be a great addition to your gardening toolkit. It can help you move heavy loads of soil, mulch, and other materials around your garden with ease.
Many kits come with all the necessary tools and hardware to get your new garden cart up and running in no time.
When shopping for a garden cart kit, be sure to consider the size and weight capacity of the cart. You’ll also want to make sure that the tires are appropriate for the type of terrain you’ll be using it on.
Some carts even come with features like brakes and adjustable handles to make moving your materials even easier.
With a little bit of research, you’re sure to find the perfect garden cart kit for your needs. Happy gardening!
How to Make a Cart With Wheels
In order to make a cart with wheels, you will need the following supplies: four wooden dowels, two small L-brackets, four furniture caster wheels, wood glue, and clamps. You will also need a drill and a saw. First, cut the dowels to size using the saw.
Then, drill holes in the ends of the dowels using the drill. Next, glue the dowels together using the wood glue and clamp them together until they are dry. Once they are dry, attach the L-brackets to either side of the cart using screws and then attach the caster wheels to each bracket.
Your cart is now complete!
Garden Cart Wheels
Garden carts are a great way to move heavy loads of dirt, mulch, or other materials around your yard. But what good is a garden cart if it doesn’t have wheels that can handle the weight?
There are a few things to consider when choosing the right wheels for your garden cart.
The first is the material the wheel is made from. Garden carts typically have either plastic or metal wheels. Metal wheels are going to be more durable and able to handle heavier loads, but they will also be more expensive.
Plastic wheels are a cheaper option, but they may not hold up as well over time or under heavy use.
The second thing to consider is the size of the wheel. Garden carts typically have either four-inch or six-inch wheels.
Four-inch wheels are going to be easier to maneuver but won’t be able to carry as much weight. Six-inch wheels will be able to carry more weight but may be harder to maneuver around tight corners.
Finally, you’ll need to decide on a tire type.
There are three main types of tires used on garden carts: pneumatic (air-filled), solid rubber, and polyurethane foam filled. Pneumatic tires will give you the best ride quality but will require more maintenance because they can go flat. Solid rubber tires are low maintenance but don’t provide as smooth of a ride.
Polyurethane foam filled tires strike a balance between ride quality and maintenance and are the most popular choice for garden carts.
Diy Lawn Tractor Cart
If you have a lawn tractor, you know how useful they can be for keeping your lawn looking neat and tidy. But did you know that you can also use them for other tasks around the yard? One great way to do this is to build a DIY lawn tractor cart.
With a little bit of time and effort, you can easily build a sturdy cart that attaches to the back of your lawn tractor. This will allow you to haul all sorts of things around the yard, from mulch and soil to firewood and garden tools. Best of all, it’s relatively inexpensive to build!
Here’s what you’ll need:
-1/2″ plywood (4’x8′)
-2″x4″ lumber (8′)
-1 1/2″ deck screws
-1/2″ carriage bolts (with nuts & washers)
-Paint or sealant
First, cut the plywood into two pieces that are 24″x48″. These will be the sides of the cart. Then, cut four 2″x4″ boards down to 47″, which will be used for the front, back, and bottom rails.
Assemble the frame by screwing the side panels into place with deck screws.
Conclusion
Building a garden cart is a great way to save your back and make gardening easier. With just a few basic materials and some easy-to-follow instructions, you can build a garden cart that will make your gardening chores a breeze. Here’s what you’ll need to get started:
1. A piece of plywood or MDF (medium density fiberboard) for the base of the cart. You’ll need a piece that’s at least 4 feet by 2 feet.
2. Four caster wheels.
Look for wheels that are at least 4 inches in diameter and have locks on them so the cart doesn’t roll away when you’re not using it.
3. Two handles, made from either wood or metal tubing. Make sure the handles are long enough so you can comfortably pull the cart behind you as you walk.
If you’re using metal tubing, be sure to sand down any sharp edges so they don’t snag on your clothing or skin as you use the cart.
4 . Nails or screws, plus some heavy-duty adhesive like construction adhesive or epoxy glue, to attach the wheels and handles to the base of the cart .
You’ll also need something to drill holes into the plywood or MDF with – either an electric drill or a hand drill will work fine .
5 A hammer or power screwdriver , depending on what kind of fasteners you’re using . 6 Paint or sealer (optional) if you want to protect your garden cart from weather damage .
Once you have all of your materials gathered , follow these simple steps to put your garden cart together : 1 ) Cut two pieces of plywood or MDF , each 4 feet by 2 feet . These will be the sides of your garden cart . 2 ) Cut four pieces of plywood or MDF , each 2 feet by 1 foot .