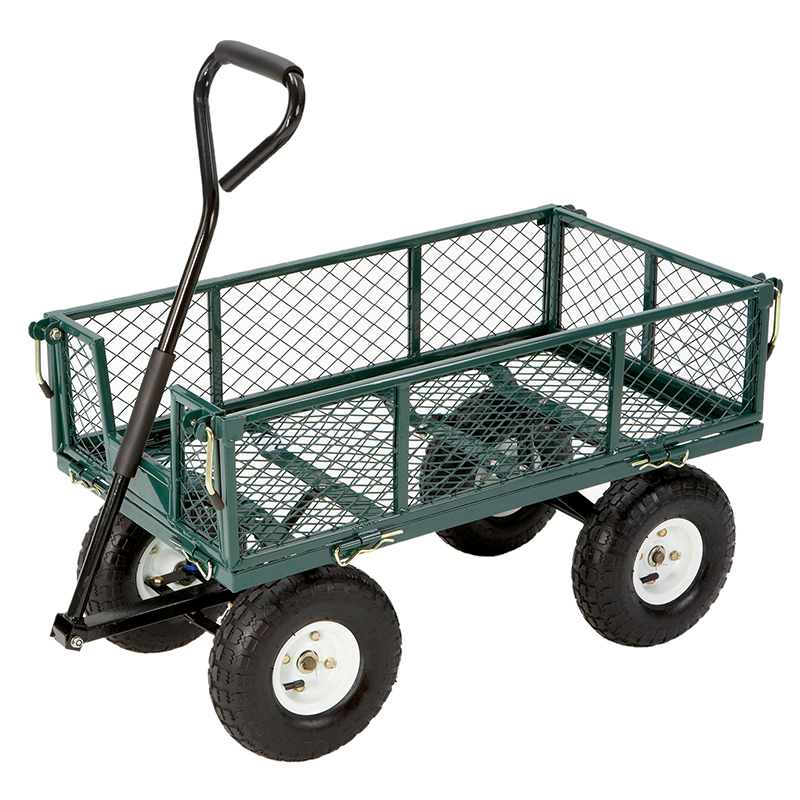
The Tricam Garden Cart is easy to assemble with just a few simple steps. First, snap the handles into the holes on either side of the cart. Next, insert the axle through the center of the cart and secure it with the included cotter pins.
Finally, attach the wheels to the axle using the included nuts and bolts. That’s it! Your garden cart is now ready for use.
If you’re looking for an easy way to transport your gardening supplies, look no further than the Tricam Garden Cart. This handy little cart can be easily assembled in minutes, and it’s perfect for hauling around all your gardening essentials. The best part?
It folds up flat for easy storage, so you can keep it out of the way when you’re not using it.
Sunnydaze Yellow Utility Cart with Removable Folding Sides – 400-Pound Capacity – QH-UC995-YW
Tricam Garden Cart Parts
If you’re in need of tricam garden cart parts, you’ve come to the right place. Here at Garden Cart Parts, we carry a wide selection of parts for tricam carts, so you can find what you need to get your cart up and running again.
Whether you’re looking for replacement wheels, axles, or other hardware, we have the parts you need.
We also carry a variety of accessories designed to make your garden cart more functional and efficient, such as dump kits and hitch kits.
Browse our selection of tricam garden cart parts today and get your cart back in action tomorrow!
Vevor Steel Garden Cart Assembly Instructions
Assuming you would like a blog post on the assembly instructions for the Vevor Steel Garden Cart:
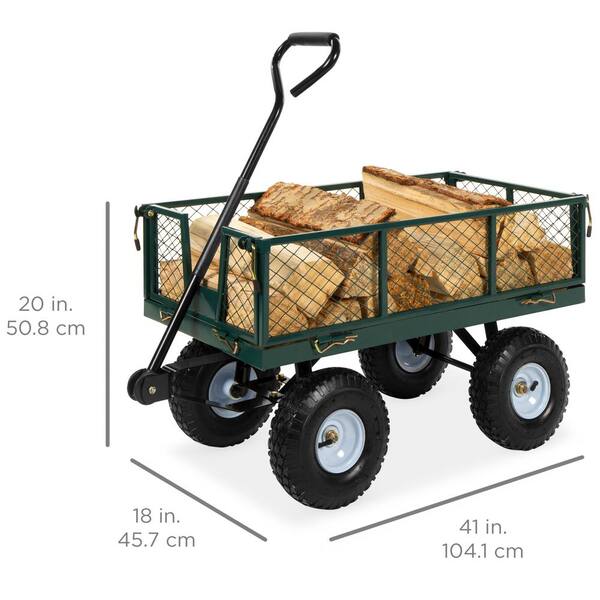
The Vevor steel garden cart is a great way to move around your garden with ease. It features four wheels and a sturdy frame that can hold up to 300 pounds.
The assembly process is simple and can be done in just a few minutes with minimal tools required.
To start, you will need to gather the following items: four bolts, four washers, and four nuts. You will also need a Phillips head screwdriver.
Once you have all of your materials gathered, begin by attaching the two front wheels to the front axle using two of the bolts, washers, and nuts. Tighten everything down securely.
Next, attach the rear wheels to the back axle using the remaining two bolts, washers, and nuts.
Again, tighten everything down securely. With all four wheels in place, you can now begin assembling the frame of the cart.
Place one side panel against the bottom of one end of the axle (the side with no wheels attached).
Line up the holes in the panel with those in the axle and secure in place with eight bolts, washers, and nuts (four per side). Repeat this step for both remaining side panels so that all three are attached to form a complete rectangle around both axles.
Now it’s time to add the handlebars.
Take each handlebar piece and insert it into one ofthe pre-cut slotsin th e top panels (make sure they’re facing inward so they’ll be comfortable t grip when pushing). Once both handlebars are in place,. bolt them securelyto teh top panels using six bolts total (three per handlebar).
And that’s it – your Vevor steel garden cart is now assembled and ready for use!
Tricam Replacement Parts
When you buy a Tricam, you are investing in a high-quality piece of equipment that will provide years of service. But like any other product, there will come a time when it needs to be repaired or replaced. When that happens, you want to make sure you are using genuine Tricam replacement parts.
Here is some information about where to find them and what to expect when making your purchase.
Tricam replacement parts can be purchased from the company’s website or from authorized dealers. When ordering from the website, you will need to know the model number of your Tricam and the part number for the replacement part you need.
You can also call customer service at 1-800-874-4115 and they will help you locate the correct part.
If you order from an authorized dealer, they will likely have the part in stock and can ship it to you right away. However, they may not always have every single part available so it is always best to call ahead and check before making your purchase.
Prices for replacement parts vary depending on the part but are generally very reasonable. Shipping costs will also vary depending on where you order from but should be fairly reasonable as well.
When replacing parts on your Tricam, it is important to follow the instructions carefully so that everything goes back together correctly and works properly when finished.
If you have any questions about how to replace a particular part, feel free to contact customer service or consult the owner’s manual before beginning work. With proper care and maintenance, your Tricam should provide years of trouble-free use!
Tricam Industries
Tricam Industries is a leading manufacturer of high quality ladders, scaffolding and other climbing equipment. The company has been in business for over 30 years and is headquartered in North Carolina. Tricam’s products are used by professionals and DIYers alike, and are known for their durability and safety.
Garden Carts
Garden carts are a great way to move heavy loads of dirt, mulch, or debris around your yard. They come in a variety of sizes and styles, so you can find one that fits your needs. Most garden carts have four wheels for stability, and some even have brakes to keep them from rolling away.
If you’re looking for a garden cart that can do it all, try the Gorilla Carts GOR4PS. This garden cart has a 400-pound capacity and comes with a removable sides for easy dumping. It also has pneumatic tires that make it easy to maneuver over rough terrain.
For something a little smaller, try the Suncast GC1500B Garden Cart. This two-wheeled cart has a 150-pound capacity and is ideal for hauling light loads around your yard or garden. It also folds up for easy storage when not in use.
Credit: www.homedepot.com
Q: How Do I Assemble the Tricam Garden Cart
If you’re in need of a little extra help around the garden, the Tricam Garden Cart is just what you need. This durable and easy-to- assemble cart features pneumatic tires that make it easy to maneuver over any type of terrain, as well as a removable basket that’s perfect for hauling your gardening supplies. Here’s how to put yours together:
1. Start by attaching the handle to the frame of the cart using the provided hardware. Make sure that the handle is securely fastened before moving on.
2. Next, attach the front wheels to the front axle of the cart using the provided nuts and bolts.
Again, make sure everything is tight and secure before moving on.
3. Now it’s time to add the pneumatic tires to each of the four corners of the cart. Simply slide each tire onto its respective wheel and inflate to your desired pressure level using a standard air pump.
4. Finally, add the removable basket to the bed of the cart by inserting its two metal hooks into pre-drilled holes on either side of the frame. And that’s it!
Conclusion
If you’re looking for an easy-to-assemble garden cart, the Tricam Garden Cart is a great option. The cart comes with all the necessary hardware and instructions, and can be assembled in about an hour. Once assembled, the cart is sturdy and can be used to haul heavy loads around your garden or yard.